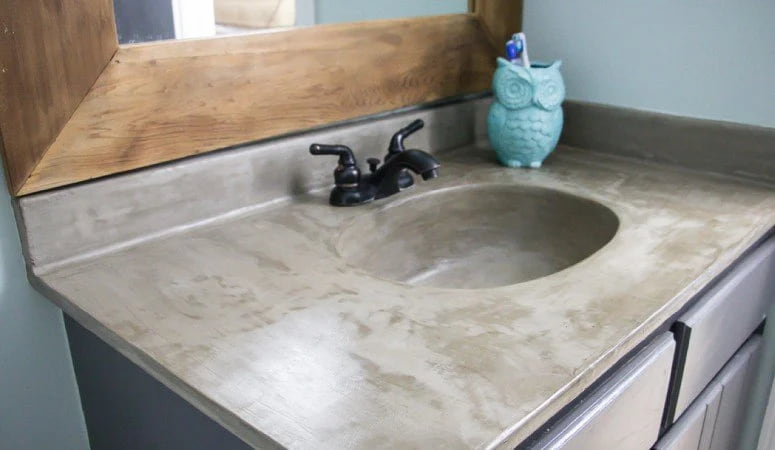
Remodeling your bathroom can be costly. But it has its rewards. To start with the modification of your home, you can begin with a DIY concrete vanity top. It is simple and it can upgrade the look of your bathroom. But what should you do first? What are the tools that you need? What are the steps to complete this project?

- Basic Things You Need to Know Before DIY Concrete Vanity top
- Tools You Need
- Steps to DIY Concrete Vanity Top
- Frequently Asked Questions about DIY Concrete Vanity Top
Basic Things You Need to Know Before DIY Concrete Vanity top
Concrete is good with any design
Concrete is a very good material to use in the bathroom. You can use any color on concrete. Any pattern or shape can also be picked for the design of concrete. Be creative in the utilization of concrete. You should know, though, that concrete, in itself has a lovely neutral color. Before picking the overall style of the concrete vanity top, make sure that it blends well with the look of the bathroom.
Concrete can be combined with other materials
Concrete can be used with glass, shells, wood, and metal. It is flexible in terms of its functionality as well. It can be shaped to any design and it can be formed to the desired angle and slope. Decide on which part of the concrete look vanity top is actual concrete and which one is tile, glass, wood, or metal.
Concrete countertops are used in all types of homes
Concrete sink molds can be seen in both high-end homes and more affordable homes. This means that a concrete vanity top with sink can add value to any type of home.
Concrete countertops need maintenance
Modern concrete vanity is not a one-and-done deal. It needs regular attention and maintenance. Just like any other countertop material, concrete is prone to staining and scratches. Because concrete is porous, it can also produce stains. You will need to reseal it every few years. The good news is that the concrete top can last a lifetime with proper care and maintenance.
Tools You Need
Before you start the process, you should first prepare the tools that you need:
- Concrete mix
- Eye protection
- Drill
- Jigsaw
- Caulk gun
- Mixing bit
- Concrete trowel

Steps to DIY Concrete Vanity Top
Build the mold
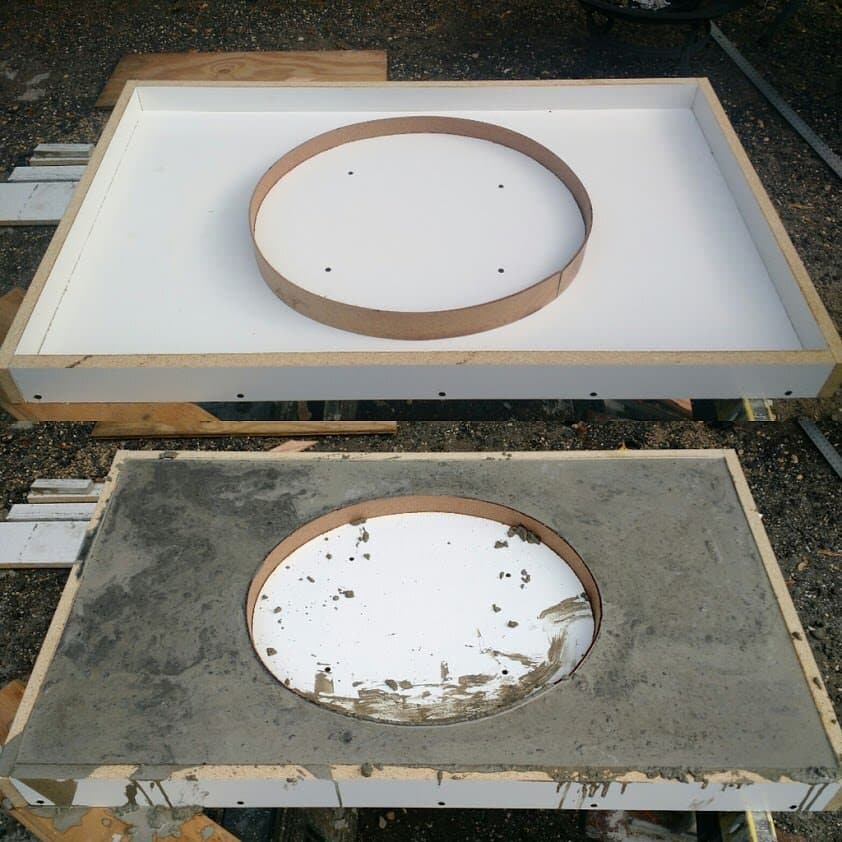
The first step in making a concrete vanity top with sink is to build the mold. This will tell how big the vanity top will be. This will also determine the dimensions of the vanity top.
With regard to this step, you should also consider the amount of overhang that the concrete vanity top will have. If one or more sides are against the wall, then you do not need to put an overhang on these sections.
Cut the melamine to the precise size that you want your vanity top to be. You should also create boards that will have the same width and height as the vanity top. You can use a drill to attach the board.
Make a hole for the faucet and sink
Since this will be a vanity top, you need to have provision for the sink and the faucet. To mark the location of these holes, you can use wood that is bigger than the needed size. You can use a jigsaw to cut the circle.
Cover the outside edges with packaging tape
You will need to attach the foams to the melamine using the caulk gun with silicone. You should make sure to apply a generous amount of silicone to the material. This will help you secure the foam. Some DIY workers use a heavy material to secure it.
Pour the concrete
After securing the mold, you can then pour the concrete into the form. You should keep in mind that a normal mixture of concrete should not be used on the vanity top. You can ask your local hardware shop for any piece of advice on what type of cement to use and what guarantees you to have a secured vanity top after curing.
Usually, the cement made for vanity is mixed with 5 quarts of water.
Smoothen out the surface
After pouring the concrete, you need to smoothen out the surface of the top using a trowel. You may want to use rebar in the narrow parts of the concrete vanity top for some crucial parts.
Prevent air bubbles
To prevent air bubbles from forming, you should vibrate the concrete. You can use an electric sander to produce the vibration.
Install the vanity top
After the concrete formed and dried, place the vanity top in its desired location. You have to keep in mind that the curing will continue for 24 hours before you can seal it. You may want to use silicone to attach the vanity top to its place.
Seal the concrete
Use the sealer to seal your concrete. You may want to ask your trusted hardware store to know the best sealant to use. You should also secure the corners and backsplashes by using a caulking gun.
Test your project
The next thing that you need to do is to test your vanity top. You should make sure that it functions based on preferences and desires. Make necessary adjustments and repairs as needed.
If the vanity top is good to use, you can ask other people to use it as well.
Conclusion
A DIY concrete vanity top is a surefire way of saving on your bathroom upgrade. You will only have to spend on materials and tools that you will use. You will also have the ability to make some last-minute changes if you need to do it. A concrete vanity top will last longer and will need less maintenance compared to other vanity types. It will also blend well with almost any design available.
Frequently Asked Questions about DIY Concrete Vanity Top
The traditional mixture of concrete will not work on the concrete vanity top. Your concrete mixture should be able to resist cracking and shrinking. It should also prevent air bubbles from forming. You can get specially formulated countertop mix concrete products in the market. These have high compression strength and are generally made to be more durable for structural purposes.
This is a good question. If you think you can follow instructions, you can do it by yourself. If you do not have the confidence to do it, the best way to go about this is to hire a contractor.
0 Comments for “How to Make a DIY Concrete Vanity Top | Step-by-Step”